|
As a rule, vegetables are
more difficult to can successfully than are fruits. However, if the
fundamental principles involved are well understood, good results may be
uniformly. obtained in canning all vegetables with ordinary kitchen
equipment. The difficulties of vegetable canning and methods of
overcoming these difficulties are taken up in the following paragraphs.
A great deal of interest
has been taken recently in vegetable canning, because of cases of fatal
poisoning from the use of home canned vegetables. These poisonings have
been caused by a very powerful toxin produced in jars or cans of
improperly sterilized vegetables by the growth of an organism known as
Bacillus botulinus. Experiments and experience have shown, however, that
the methods described in this book are perfectly safe. All that is
necessary is that the methods be well understood and applied
intelligently.
16. Peeling and
Preparing. Vegetables for canning should be as fresh as possible.
Waste no time in getting the vegetable from the garden into the can.
Asparagus becomes tough and bitter if held twenty-four hours. String
beans lose flavor and crispness; peas may ferment; and corn loses in
flavor and sweetness if kept too long uncanned after gathering. The
vegetables should therefore be canned on the same day that they are
picked.
Vegetables should usually
be graded for size and appearance. The amount of grading will depend on
whether the product is for home use or for sale. Grade asparagus into
two or three sizes and peas into young tender pods and larger, more
mature pods. Other vegetables need not be graded, unless for sale. In
this case select the material of best appearance for canning for market
and the less attractive vegetables for home use.
The vegetables should be
thoroughly washed to remove earth, etc. A large tub may be used for
this.
In small scale canning
the peeling, cutting, and preparation for the can must in practically
all cases be done by hand. Root vegetables such as beets, turnips, and
carrots, may be peeled by the peeler shown in figure 43. In canning
factories, peas are threshed and graded by machinery, while corn is
silked and cut from the cob by special machines. Other vegetables are
prepared largely by hand labor.
17. Blanching or
Parboiling. Most vegetables are given a short preliminary boiling in
water after grading, cutting, and peeling. This improves the texture and
color and usually removes disagreeable flavors and mucilaginous
substances from the skins. The process is spoken of as "blanching," but
is nothing more nor less than parboiling.
The prepared vegetables
are placed in a screen basket or in a cheesecloth and plunged into
vigorously boiling water for a length of time varying from a few seconds
to ten minutes, the time depending on the vegetable and its degree of
maturity. Small green peas will require less than a minute, while large
stalks of asparagus may require ten minutes' blanching. Blanching cooks
the vegetables more rapidly than cooking in the can, and tough
vegetables can be made tender with less trouble in the blanching process
than in the sterilization process. Convenient methods of blanching are
illustrated in Fig. 8. Tomatoes are parboiled or steamed about one
minute and beets about fifteen minutes to cause the skins to slip off
easily in peeling. They are chilled after heating to facilitate handling
in peeling.
18. Chilling. The
blanched vegetables must be placed in the can with all expediency. To
make them cool enough to handle, they should be plunged into cold water
after blanching. Chilling in this way also sets the color in green
vegetables and tends to make most vegetables more crisp.
19. Brine and
Acidified Brines. Vegetables, with the exception of tomatoes, are
canned in dilute brine. Tomatoes are canned without any liquid except
their own juice.
The usual brine contains
from two to three ounces of salt per gallon. For practical purposes, an
ounce is equivalent to a level tablespoonful of salt; this rule will
save trouble in making up small quantities of brine.
Most vegetables are
deficient in acid and if canned in a salt brine only are very difficult
to sterilize. That is to say, the spores of the bacteria occurring on
vegetables are very difficult to kill under this condition. If, however,
the deficiency in acidity of the vegetables is made up by the addition
of a small amount of some harmless acid substance such as lemon juice or
vinegar, the vegetables are as easily sterilized as fruits. For example,
in ordinary brine, asparagus must be sterilized for at least three hours
in boiling water, while if a small amount (4 ounces or 8 tablespoonfuls
per gallon) of lemon juice is added, this vegetable may be sterilized in
one hour or less. Other vegetables behave similarly. Vinegar may be used
to replace lemon juice, although slightly 'more is needed because
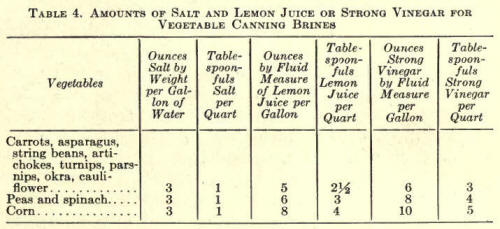
ordinary vinegar is not quite so acid as lemon juice. The following
table gives the amounts of salt and lemon juice or cider vinegar to use
for various vegetables.
The advantage of this
so-called "lemon juice" method is that the time of sterilization in
water at 212° is greatly shortened and made much more certain. It is
probably the most satisfactory method for home canning. The amount used
does not materially affect the flavor. The brine can be discarded when
cans are opened and the vegetables cooked in fresh liquid or a small
amount of baking soda may be added.. This will remove practically all
taste of the lemon juice or vinegar, should this flavor prove
objectionable. Many vegetables are improved by the addition of the small
amount of lemon juice or vinegar recommended.
20. Addition of the
Brine. The brine should be added boiling hot to cans that are to be
sealed, or the cans should be exhausted in steam or boiling water before
sealing (see paragraph 14). Jars require a shorter time to heat if
filled with hot brine. A teapot makes a very convenient utensil for
heating and pouring brines or sirups into cans or jars. (See Fig. 10.)
21. Sterilization.
Four ways of sterilizing vegetables are used. These are: (a)
Sterilization under steam pressure; (b) intermittent sterilization in
boiling water; (c) sterilization in boiling water by a single long
sterilization; and (d) sterilization in boiling water by a relatively
short heating after addition of a small amount of lemon juice or vinegar
to the brine used in canning.
(a) Pressure
Sterilization: The boiling point of water rises if steam is confined in
a closed space, and temperatures much above 212° F. can be attained in
this way. By this means the spores of many bacteria that are killed with
the greatest difficulty at the temperature of boiling water are
destroyed by a few minutes' heating under five to fifteen pounds' steam
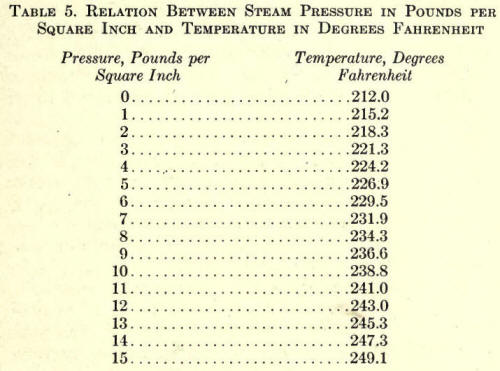
pressure. These pressures correspond to 228° F. and 250° F.,
respectively.
The following table shows
the relation between steam pressure in pounds per square inch and
temperature in degrees Fahrenheit. The table is of use where the
sterilizer used may not be equipped both with a thermometer and a steam
gauge.
The steam pressure
sterilizer is independent of altitude and therefore is of value in
elevated regions.
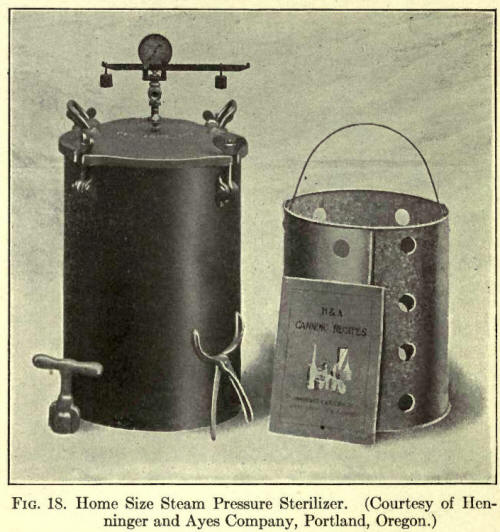
Several forms of steam
pressure sterilizers for home use are on the market. There is one known
as the "water seal outfit," which gives temperatures only slightly above
the boiling point of water. This is considered favorably by many home
canners; because it requires only a small amount of water, is easily
heated, and is inexpensive. Another type can be operated only up to five
pounds' pressure per square inch. Most forms of pressure cookers will
withstand a steam pressure of 15 pounds or more per square inch.
Steam pressure
sterilizers or retorts can be obtained in sizes holding from two dozen
cans to several thousand. The small outfits are heated by direct heat;
the large ones, by steam from a boiler.
Steam pressure
sterilizers can be used for sterilization at 212° F. by simply opening
the release cock and keeping the pressure at 0 pounds.
Steam pressure
sterilizers are well suited to sterilization of cans but are not
convenient for jars.
In using the sterilizer,
seal the cans of vegetables hot and place them in the basket or crate.
Add water to the depth of several inches. Lower the crate and contents
into the retort. Clamp the lid securely on the sterilizer and leave the
release cock open. Heat the water to boiling and as soon as steam
escapes freely from the cock close it. The purpose of leaving the cock
open at first is to allow the steam to displace the air in the retort;
otherwise the pressure in the retort would be due to compressed air and
the temperature would be uneven and not in proportion to the indicated
temperature or pressure. Heat until the dial of the steam gauge
indicates the desired pressure or until the thermometer reaches the
desired temperature for the required length of time by regulating the
fire or by opening the release cock sufficiently, and by setting the
weight on the safety valve so that it will release the steam
automatically when the proper pressure is reached.
When the cans have been
sterilized sufficiently, open the release cock and as soon as the
pressure falls to zero, remove crate and contents and cool in a tub of
cold water if cans have been used.
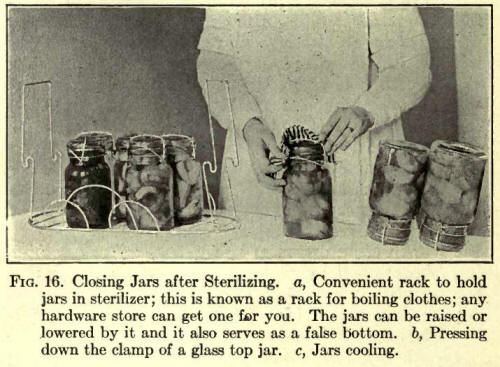
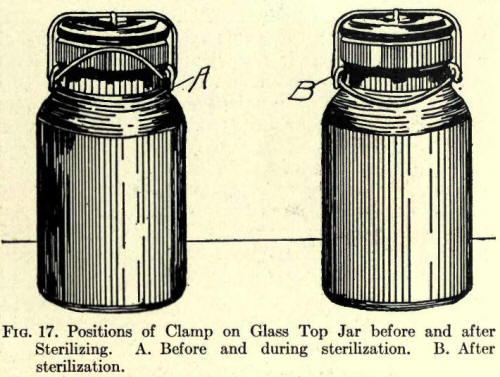
If jars are used, leave
the lids and rubbers on loosely during sterilization. Close immediately
after removal from the sterilizer, but do not, of course, chill the
jars. (See Fig. 18.)
(b) Intermittent or
Three-Day Sterilization of Vegetables at 212° F. is accomplished by
heating the container and contents to the boiling point of water for a
specified length of time on several (usually three), consecutive days.
It is the most effective method at 212° F., because the bacterial spores
start to grow between sterilizations from the softening effect of the
heat and are easily killed by the second and third sterilizations.
Cans are sealed hot and
heated usually for one hour in boiling water or steam on each of three
successive days. Jars are heated the first day with rubbers removed and
caps on jars loosely. At the end of the first sterilization rubbers are
sterilized in boiling water about five minutes, placed on the hot jars
and the caps are screwed down. The second and third days the
sterilizations are carried out without loosening the caps because the
vacuum formed after the first day's sterilization will prevent bursting
of the jars.
The three-day method is
safe, but often softens the vegetables so much that they become
unattractive in appearance.
(c) Sterilization of
Vegetables at 212° F. by One-Period Method: By this method the
vegetables are heated in boiling water or steam once only, but for a
long period of time. The method is recommended strongly by the United
States Department of Agriculture in Farmers' Bulletin 839 and is in
extensive use.
No pressure sterilizer is used with this method. It sometimes results in
softening of the vegetables from overcooking. Results of investigations
by Dr. Dickson of Stanford indicate that this method does not always
kill spores of certain bacteria. Method "(2)," described below, requires
a shorter time of sterilization and therefore results in a more
attractive product.
(d) Sterilization by the
Lemon Juice Method: If a small amount of harmless vegetable acid in the
form of lemon juice or vinegar is added, the brine vegetables are,
easily sterilized by a single sterilization at 212° F. The vegetables
are best acidified by adding the lemon juice or vinegar to the brine
used in filling the cans or jars. The amounts to use for various
vegetables will be found in Table 4. The method is used as follows:
Pack the vegetables in
the usual way. Add the hot brine which has been acidified. Seal the cans
and put rubbers and caps loosely on the jars. Sterilize in boiling water
or steam from three-quarters to two hours, depending upon the vegetable.
Remove cans and chill in water. Remove jars and seal.
This method does not
result in overcooking and retains the color and flavor more perfectly
than other methods. It produces a slight acid taste in some vegetables.
This can be removed before cooking for the table by drawing off the
brine and cooking in fresh water in the usual way or by adding a small
amount of baking soda before cooking for the table. The method has been
proven safe and free from danger of botulinus poisoning. |

