|
Fruit canning is one of
the most important of the food preservation industries. It is no longer
a by-product industry, but is now a primary industry for which enormous
quantities of fruit are grown annually.
In addition to the fruit
canned commercially, many millions of cans and jars are put up each year
by housewives in the kitchen or by families who use small scale canning
outfits. It is for those engaged in canning for home use or in a small
way for local sale that the following discussion is intended, although
the principles involved will be of interest to commercial fruit canners.
The various steps in the
canning process have been taken up in the order in which they occur in
practice and each is discussed separately. For convenience of reference,
the various topics taken up have been numbered serially. The material in
this chapter is general and aims to give the principles of canning and
descriptions of apparatus used rather than specific directions or
recipes. Recipes will be found in Part III, Recipes 1-19, inclusive.
1. Picking. Fruits
for canning should be prime ripe; not over-ripe and soft, or too green.
An exception to this rule is the pear. Pears should be picked when full
size, but still green and should then be ripened in the box because tree
ripened pears lack flavor and are coarse in texture. Under-ripe apricots
remain astringent and tasteless regardless of the amount of cooking or
sugar used.
The fruit should be
handled carefully to prevent bruising. Berries and soft fruit should be
kept in shallow boxes until canned.
The fruit should be taken
to the canning room as soon as picked. In most fruits, there is a rapid
deterioration both in texture and flavor after picking.
2. Grading and Sorting.
The appearance of the canned fruit is greatly improved by sorting the
fruit according to appearance and grading for size. In home canning all
grading can be done by hand and at the operator's discretion. Where
large quantities of fruit are to be graded for size, the grading for
size is done by mechanical graders that can be adjusted to different
varieties of fruit.
In home or small scale
canning three grades will usually be sufficient: "Fancy," consisting of
the finest and largest fruit; "Standard," medium sized fruit, and this
grade may also include fruit that is more or less imperfect in
appearance but of good size; "Pie Fruit," soft, small, and badly
blemished fruit.
Grading is highly
desirable if the fruit is canned for sale.
3. Peeling, Pitting,
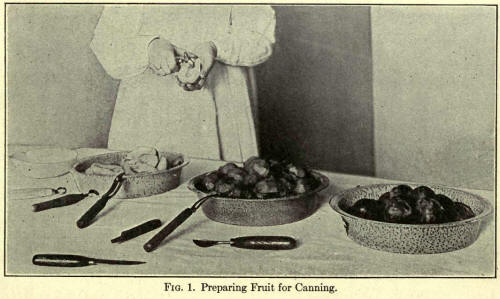
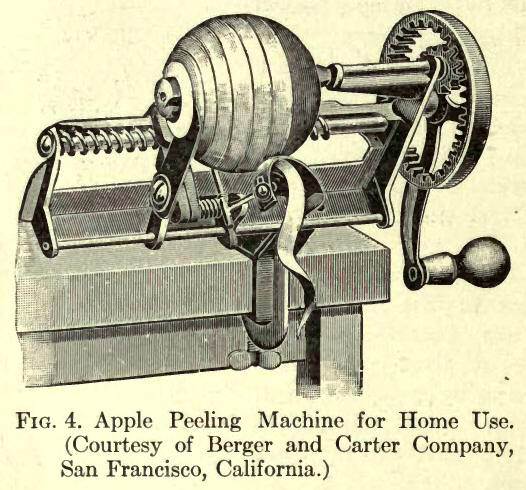
Coring and Cutting. Large fruits for home canning are peeled,
usually by hand with a knife, although small hand power peelers for
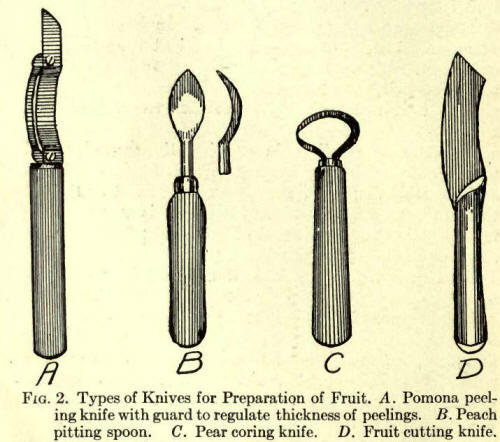
apples and peaches are available. The Pomona and similar types of
peeling knives fitted with a guard will tend to prevent waste of fruit
in peeling (Fig. 2).
Peaches and apricots are
peeled commercially by immersing them in a boiling 10% solution of soda
lye. The method is rather difficult to use in the household. A
modification of this method of peeling can be used on a small scale as
follows: Make a solution of three-fourths of a pound of soda lye per
gallon of water. Use an agateware or iron pot; never aluminum. Heat to
boiling. Immerse the fruit in a wire basket in the hot lye long enough
(about 20 to 30 seconds), to soften the skin.
Plunge fruit into large
pot of cold water and rub off skins with the hands. Wash off all trace
of lye in another pot of water. Vigorous washing will be necessary to
remove the last traces of lye from the fruit.
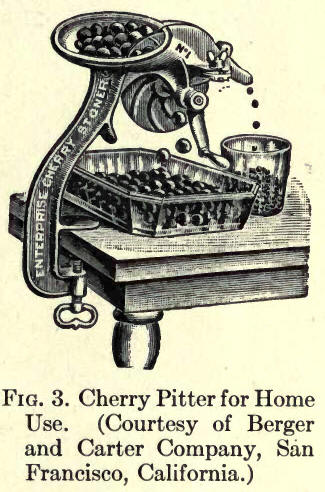
Cherries are often
pitted. Small hand pitters can be bought at any good hardware store for
fifty cents to a dollar. These same pitters can also be used for olives.
The pitters consist of a small plunger with a cross-shaped point that
forces out the pit.
A convenient cutting
knife for halving peaches, pears, etc., is shown in the accompanying
figure.
The pits of clingstone
peaches must be removed with a special pitting knife or "spoon." The
flesh is first cut along the line of suture with a cutting knife. The
pitting spoon is then forced into the peach at the stem end and is
manipulated so that the pit is cut from the flesh with as little loss as
possible of flesh adhering to the pit. The fruit is then cut in half and
is separated from the pit. Commercially, the halves are not peeled
before pitting and the peeling is done later in a lye vat; in the
household, it is advisable to peel cling peaches by hand before pitting.
 Pears
are hand peeled; they are cut in half and the core removed with the
coring knife shown in Figure 2-C. Pears
are hand peeled; they are cut in half and the core removed with the
coring knife shown in Figure 2-C.
4. Jars. Because
they can be used repeatedly from year to year, jars are more
satisfactory than cans for putting up fruits in the household. There are
numerous types and sizes of glass jars. Most of these give satisfaction
if used properly. Their choice is largely a matter of personal
preference.
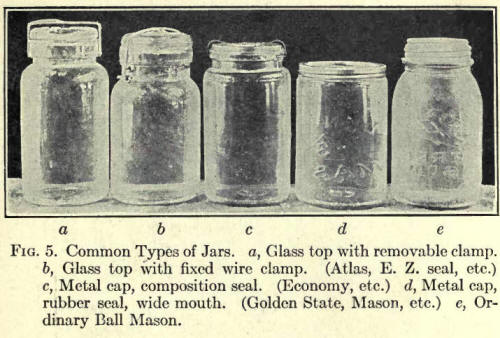
The various brands of
jars that are equipped with glass tops, rubbers, and wire clamps are
very satisfactory because of their durability, their simplicity, wide
openings for filling, convenience in sterilizing, and because of the
fact that no metal comes in contact with the food and it is not
necessary to replace the caps, as is often the case with some other
types of jars. The various modifications of the Economy jar are
excellent, if their use is well understood. They are sealed with a
lacquered metal cap carrying a composition which melts during
sterilization and hardens to form an air-tight seal as the jars cool.
The caps can be used only once.
The ordinary Ball Mason
jar is probably the most commonly used of all jars. The lacquered metal
caps are superior to the old style porcelain and zinc cap. This latter
style corrodes in time and becomes leaky. . The main objection to the
Mason jar is the narrowness of the jar mouth. A wide mouth Mason is now
on the market but the caps are very difficult to remove and must usually
be replaced each year. The new Mason with the so-called " vacuum seal "
is excellent.
More important than the
jar is the rubber. Select rubbers of the best material. Before buying,
test them, by stretching them severely. Brittle rubbers will not stand
processing; - they will often spread and cause leaks that result in
spoiling of the contents of the jar. Rubbers of good elasticity will
often last two seasons. It is, however, a good plan to buy new rubbers
each season rather than to risk spoiling through the use of old rubbers.
It is sometimes possible to use two old rubbers to each jar with good
results.
3. Wax Top Cans.
Three types of cans are used in home and farm canning. These are the wax
top can, the solder top can, and the open top or Sanitary can.
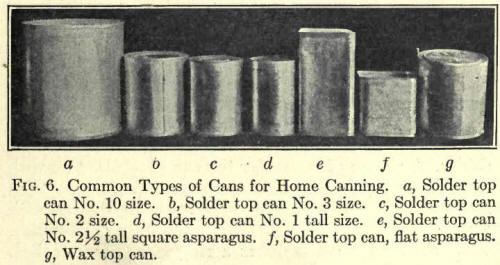
The wax top can is fitted
with a groove around the edge of the top. The lid fits into this and the
seal is made after sterilization by pouring hot sealing wax to fill the
groove or by filling the groove with a specially prepared waxed string.
The wax top cans are excellent for fruits but are not very satisfactory
for vegetables or meats, because of the difficulty in sealing the cans
while still boiling hot. It is possible to permit the cans to cool
slightly before sealing when used for fruit and then no difficulty is
met with in applying the wax. Advantages of the wax top can are its wide
opening through which large fruits and whole tomatoes may be filled into
the can and the fact that the cans may with care be used everal seasons.
The sealing is very simple and requires no special equipment or
experience.
6. Solder Top Cans.
Solder top cans are closed with solder. The cap of the solder top can is
soldered on with a special soldering steel after the can is filled. It
is sealed by closing a small vent hole in the center of the can with a
drop of solder. Two styles of caps may be obtained. The solder hemmed
cap has a ring of solder attached. The lid is soldered to the can by
simply melting this ring of solder. The plain caps have no hem of solder
and solder must be melted against the capping steel. This is wasteful of
time and solder. Solder hemmed cap should be used if they can possibly
be procured. The sealing of solder top cans is described in a recipe and
illustrated in. Fig. 56.
7. Cooking the Fruit
before Filling the Containers, or Hot Pack Method. There are two
ways of canning fruits. These are known as the "cold pack " and the "hot
pack" methods, respectively. In the cold pack method the fruit is packed
into the jars or cans immediately after peeling, pitting, etc.; sirup or
water is added and the fruit is cooked in the container. The fruit holds
its shape and flavor well in this method but some fruits contract a
great deal during sterilization, leaving the jar or can unfilled. In the
hot pack method this contraction takes place outside the container and
more fruit can be packed into each can or jar. It is therefore a more
economical method for home use.
The fruit is prepared for
the can by grading, peeling, coring, and pitting as the case requires.
For sour fruits, one-half cup of sugar is added to each cup of fruit;
for sweet fruits one-fourth cup; for pie fruit, no sugar. Just enough
water is added to prevent scorching. The fruit is cooked over a slow
fire with very little stirring until about half cooked.
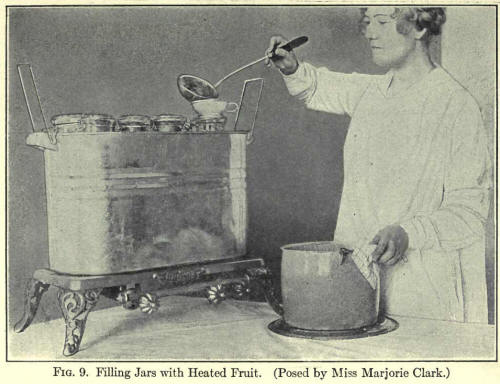
By means of a ladle and
wide mouthed funnel it is poured into scalded jars or cans and
sterilized.
This method differs from
the usual household "hot pack" method in which the fruit is completely
cooked before placing it in the jars and in which no further cooking is
given. The method of cooking completely before packing into cans or jars
results in considerable breaking of the fruit and gives a less
attractive appearing product.
8. Filling Jars and
Cans without Previous Cooking of the Fruit—Cold Pack Method. The
fruit is prepared by peeling, coring, and pitting. It is packed into
jars or cans without cooking. Hot sirup or water is added according to
the grade of fruit. Sterilization and cooking are carried out in the
cans or jars. This method is used exclusively by commercial canneries
and is recommended strongly by the United States Department of
Agriculture and the State Experiment Stations for use in the household.
It is the least laborious of any method, but is not best for household
use, because it does not utilize all of the space in the jars or cans,
because considerable shrinkage occurs during sterilization. Partial
cooking of the fruit
before canning and sterilizing gives better results in the kitchen.
9. Sanitary Cans.
This is the type of can used in commercial canneries. No solder is used
in sealing it. The cap is crimped or spun on by a special machine after
the cans are filled.
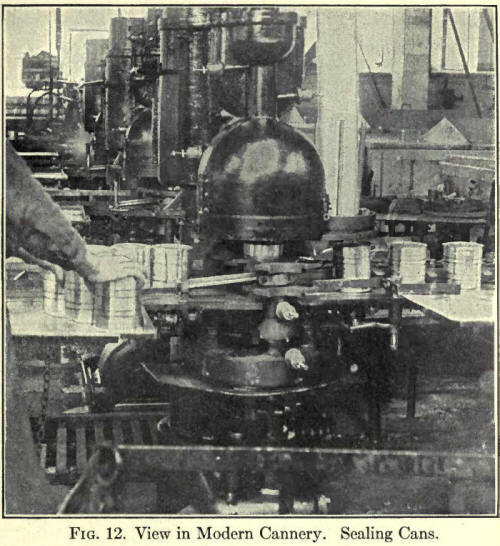
The commercial sanitary
capping machine costs several hundred dollars or is rented by can
companies for about fifty dollars per season. A motor or other
mechanical source of power is necessary to run the capping machine.
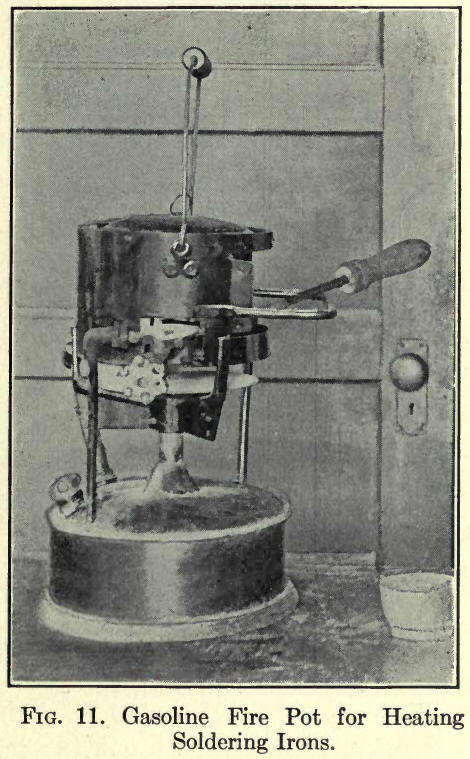
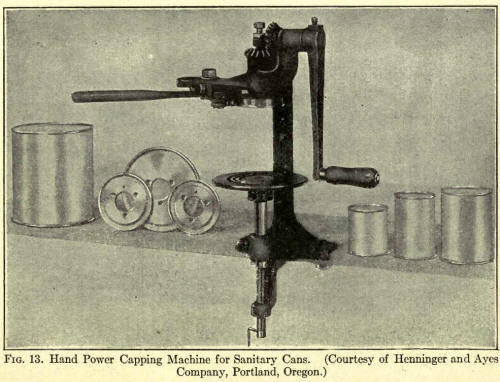
Small hand power capping
machines costing from $13 and upward are available. Considerable skill
and experience are required to make their use a success. With care and
practice, however, satisfactory results can be attained. Directions for
the use of these machines accompany them. One form of hand power
sanitary can capping machine is shown in Fig. 13.
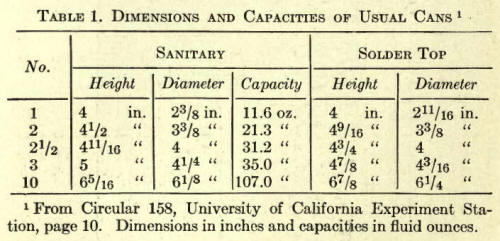
10. Sizes of Cans.
Cans for food preservation vary in size from about one-fourth of a pint
to five gallons. The sizes are usually designated by numbers rather than
by "quarts," "pints," or "gallons." The contents of solder top cans and
sanitary cans of the same numbers do not exactly correspond. The
following table gives the contents of the various sizes of sanitary and
solder top cans:
11. Net Weights that
Cans for Market Must Contain. Cans or jars of fruit for market are
packed according to weight. The net contents of the containers must be
declared on the label and the contents must equal or exceed the amount
declared. Commercial canneries provide counterpoised scales and fill the
cans according to weight. During sterilization the weight will decrease
because of the shrinkage of the fruit in the sirup. The label must
therefore state the net contents based on weight of the fruit when the
can is opened after sterilization and this must be taken into account
when filling the cans.
Dr. A. W. Bitting has
done a great deal of work upon the net contents of cans of fruit and has
published tables showing the relations between the fresh weight of fruit
placed in the cans and the weight on the "cut out"; that is, when the
can is opened several weeks or longer after sterilization. The weight
immediately after sterilization will not be the same as that several
weeks after sterilization because of the equalization of sugar in the
sirup and fruit that takes place slowly after sterilization.
To determine the weight
of fruit in a can, the can is opened and the contents are drained on a
screen, or the top is cut and the fruit drained by inverting the can.
The contents are stated
either as net weight of fruit or as total weight of fruit and sirup.
The following table gives
the relation between the weight of fruit placed in the can before
sterilization and that some time after sterilization, for various fruits
and sizes of cans. The table is based on results published by Dr. A. W.
Bitting in Department Bulletin 196 of the United States Department of
Agriculture.
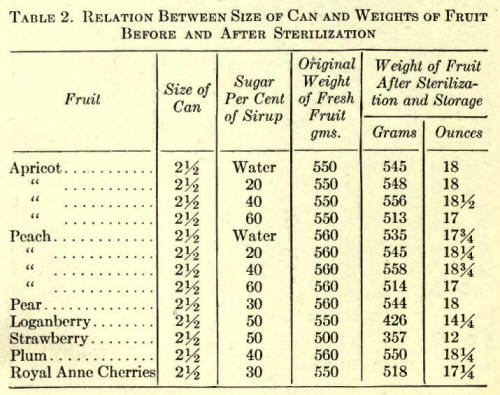
The weights of fresh
fruit in Column 4 may be taken as the proper amount to weigh into the
cans of this size before sealing, if the fruit is for market;- because
the figures were obtained upon fruits packed in the usual commercial way
and represent average conditions. The net contents to be published on
the label would be obtained from Column 5. Five hundred and fifty grams
corresponds to 183 ounces; 560 grams to 18% ounces; and 500 grams to 16%
ounces.
12. Sirups and
Hydrometers. In commercial canning, fruits are packed in the cans
before cooking. A sirup is added and the fruit is cooked in this sirup
in the can. The sirups are made to contain various percentages of sugar,
according to the various grades and varieties of fruit.
The sirups are tested
before use by means of a sugar hydrometer or saccharometer. There are
two general makes of hydrometers; namely, those which indicate the per
cent of sugar directly, and those which indicate the Baume degree, which
is approximately one-half the real per cent of sugar. The Brix and
Balling hydrometers indicate actual per cent of sugar.
The hydrometers consist
of a glass tube with a long narrow stem at the top and an enlarged lower
end weighted with shot or mercury. The upper stem carries a scale marked
either in per cent sugar (Balling or Brix degress) or in degrees Baume.
The instruments sink to 0 in water. Liquids containing sugar or other
materials in solution exert a greater buoyant effect than water and the
instrument rises in proportion to the amount of sugar present.
To use the instrument, a
tall glass jar or cylinder is filled with the sirup. A tall green olive
jar or a tall narrow flower vase will do for a cylinder. The hydrometer
is inserted and the degree indicated at the surface of the liquid is
read. (See Fig. 32.)
The sirup should be cool
when the test is made because high temperatures cause the reading to be
too low.
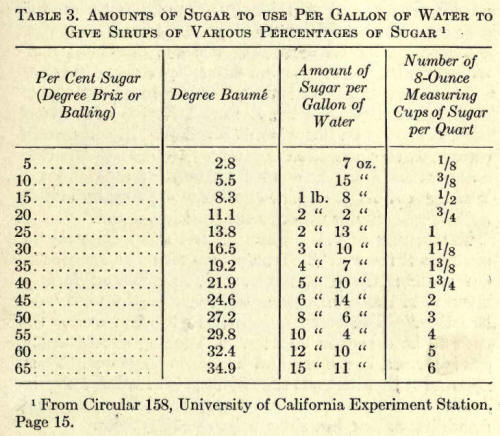
The hydrometer need not
be used in household canning. Sirups. can be made up accurately enough
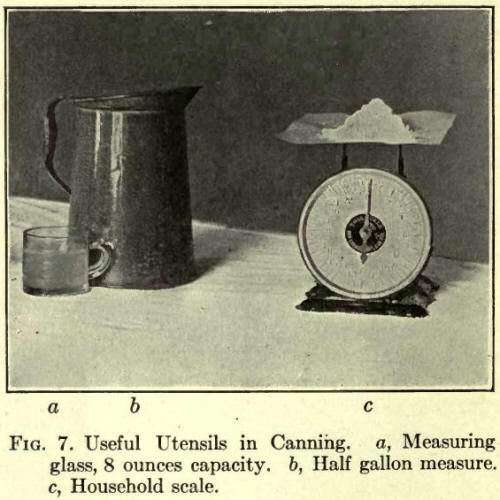
for this purpose by making use of the following table. For each gallon
of water used in making the sirup weigh out the amount of sugar given in
Column 3 of the table and dissolve in one gallon of water. To use Column
4, measure out the amount of sugar indicated and dissolve in one quart
of water.
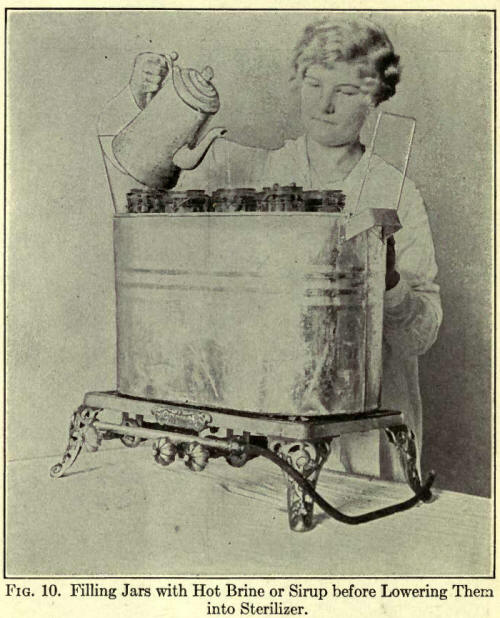
The sirup in home canning
is added boiling hot to save time in sterilizing and to avoid the
necessity of " exhausting." See paragraph 14. The sirup may be heated in
a teapot and poured directly into the jars or cans. It should be poured
down through the center of fruit packed in jars rather than against the
sides of the jar. This will prevent breakage. (See Fig. 10.)
13. Cane vs. Beet
Sugar. An unwarranted prejudice exists against beet sugar for
canning. Cane and beet sugar are one and the same thing chemically and
modern factory methods produce beet sugar of just as good quality as the
best cane sugar. Both are used in commercial canneries with equally good
results.
A number of years ago
beet sugar was in some cases poorly refined and occasionally of poor
flavor on this account. This condition no longer exists and beet sugar
can be used for canning, jelly making, preserves, marmalades, etc., to
just as good advantage as cane sugar.
14. Exhausting. If
fruit is put up in solder top or sanitary cans (see Recipe 1, Part III),
the contents of the can should be hot when it is scaled. In commercial
canneries, this condition is attained by heating the cans and contents
after the can is filled and before it is closed. The same effect is
obtained in home canning by adding boiling hot sirup or water to the
fruit in the can.
Exhausting or the
addition of hot sirup expands the contents of the can. The can is then
sealed and sterilized. On cooling, the contents contract again and form
a vacuum in the can. Hence the origin of the term "exhausting." The
vacuum formed in the can causes the ends to be drawn in slightly. If
spoiling should occur, gas is formed in the can and the edges bulge out.
Thus, a can of fruit with ends slightly drawn in is known to be good.
This is the principal reason for exhausting cans, or adding boiling hot
sirup before scaling them.
In exhausting solder top
cans, the fruit and sirup are placed in the can cold. The cap is sealed
on the can as directed in Recipe 1, but the vent hole is left open. The
cans are placed in boiling water to about three-fourths the depth of the
cans. A washboiler or other sterilizer can be used. They are left
approximately five to ten minutes depending on the size of the can. They
are then removed and the vent hole is closed or "tipped" with a drop of
solder. The can is then ready for processing.
To exhaust sanitary cans,
one proceeds as with solder top cans, but does not place the lid on the
can until after exhausting. Then it is sealed in a sanitary capper such
as the one shown in Fig. 13.
15. Sterilization of
Fruits. Sterilization is the destruction of all living
microorganisms in the product sterilized. It is usually accomplished by
heat and accompanied by hermetic sealing so that the contents of the
container will not become re-infected with microorganisms.
Fruits, because of their
high acidity, are easily sterilized by heat; a temperature of 165° F.
being sufficient. However, since it is usually desirable to cook the
fruit at the same time, the sterilization is carried out at the boiling
point, i. e., 212° F.
The old household method
consisted in cooking the fruit in a pot and pouring it boiling hot into
scalded cans or jars and sealing at once without further treatment. This
method is unsafe because often the jars and caps do not get thoroughly
sterilized by the hot fruit, and spoiling results.
Sterilizing the fruits in
the container is much safer and more economical of time and labor. Any
form of sterilizer in which the cans or jars may be subjected to the
temperature of boiling water for the desired length of time may be used.
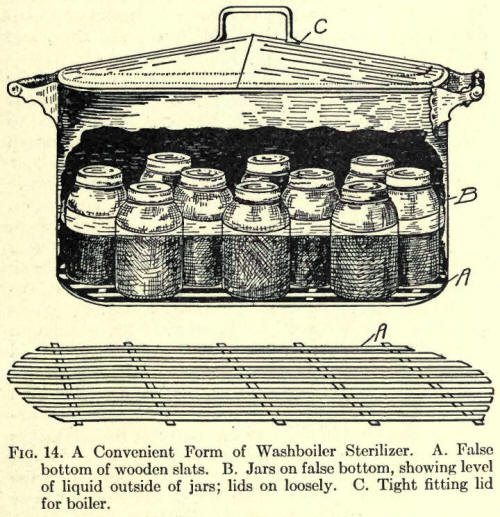
A very simple sterilizer
for home use may be made by placing a false slat or screen bottom in a
washboiler. The jars rest on this false bottom to protect them from the
direct heat of the flame. (See Fig. 14.) A very convenient frame for
holding jars in a washboiler may be bought in the form of a rack used
ordinarily for boiling clothes. Figure 16 illustrates such a rack. This
also acts as a false bottom. It is improved by soldering a wire guard on
the sides of the rack to hold the jars in place.
In using a washboiler
sterilizer the jars are filled with fruit and hot sirup or water is
added, the lids and rubbers placed on loosely, enough water is added to
the boiler so that when the jars are placed in it the water will rise to
about two-thirds the height of the jars, the water is heated to the
temperature of the jars or a little higher, the jars are placed on the
false bottom, the cover is placed on the boiler, the water is heated to
boiling, and boiled for the length of time desired for the particular
fruit to be sterilized. The time is counted from the time the water is
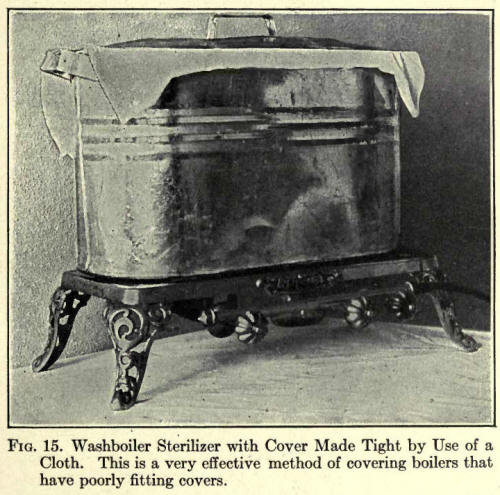
actively boiling. The tops of the jars are heated by the steam. If the
lid of the boiler fits imperfectly a towel may be placed between the lid
and boiler top to make the seal more perfect. (See Fig. 15.)
The jars after
sterilization are removed at once and the caps are tightened. If the
false bottom or rack is equipped with handles the removal of the hot
jars is greatly facilitated. Jar tongs may also be used to lift the jars
from the hot water.
The length of time of
sterilization will vary with different fruits and with the maturity of
the fruit. This variation is because of the differences in texture; not
because some fruits are harder to sterilize than others. Firm fruits,
such as certain varieties of clingstone peaches, and pears, require a
longer time than softer fruits, such as most freestone peaches and
plums. The length of sterilization for various fruits is taken up under
the recipes for each fruit.
Various forms of
commercially made sterilizers for fruits may be purchased. These give
satisfactory results and where very large quantities of fruits are to be
canned their use may become desirable. There are types of commercial
sterilizers designed primarily for the sterilization of vegetables and
meats under steam pressure, but which can also be used for fruits. These
are discussed under paragraph 21, Sterilization of Vegetables. (See Fig.
18.) |

